前言
对于博客搭建,hexo怕是大家都耳熟能详,但是hugo是比较新的一种搭建方式,Hugo是由Go语言实现的静态网站生成器。简单、易用、高效、易扩展、快速部署。
两者的文章书写方式都是MarkDown的语法,对于迁移有很大的帮助。hugo的快速和MemE让我眼前一亮,以下是我通过hexo迁移hugo历程
windows安装
针对于不同的操作系统,安装过程会有所不同,我以windows为例,通过hugo releases地址 选择相关系统的压缩包
提示:
1、下载带有extended的扩展版包
2、在windows的环境变量Path中配置hugo路径
Hugo的使用
先查看hugo版本,然后进行博客站点的创建
| |
命令执行之后生成目录结构及与Hexo的目录结构的差异性
.                     # 说明             Hexo
├── archetypes/     # 文章模板          scaffolds/
├── assets/         # Hugo 管道
├── config.toml     # 配置文件          _config.yml
├── content/        # 文章目录          source/_posts/
├── data/           # Hugo 数据文件     source/_data/
├── layouts/        # 布局模板
├── public/         # 生成的静态文件     public/
├── resources/      # Hugo 缓存
├── static/         # 网站的静态文件     source/
└── themes/         # 主题目录          themes/
安装MemE主题
进入blog站点博客目录,进行主题的安装,例如我选择的MemE主题
| |
hugo的blog开始之路
1️、替换 config.toml
对于简体中文用户,可以通过一下命令替换 config.toml 文件,替换成简体中文版本
| |
2️、 新建文章
| |
在content目录会生成相对应的文件,例如posts/hello-world.md文件,about/_index.md文件,_index.md文件是主页,可以直接在浏览器打开
在hexo迁移hugo中可以把原来hexo的文件source目录下的文章cp过来
3、起本地服务
| |
build很快,出现 http://localhost:1313/,可以直接打开浏览器访问,随意更新md文章,博客站点内容会自动更新,整挺好😄
定制
相关配置可在config.toml文件中进行配置
你想要自定义样式,推荐在assets目录下创建assets/scss/custom/_custom.scss 文件,不修改theme文件下的样式文件(当时使用hexo就是在theme修改☹️),以防止覆盖theme目录下的样式文件(别留坑)
部署🚀
对于部署我们一般只要用到public构建出来的文件目录、然后部署在服务器上,这样可以避免大量的文件上传,提高部署的效率。我使用最简单Github Pages服务搭建
手动部署
1、在Github上创建一个Repository,命名为 githubName.github.io(githubName替换为你的github用户名 )
2、执行以下命令关联Github Pages Repository
| |
注意: 这种public关联后,整个项目blog想关联其他的github Repository做备份时,需要重复关联git remote add origin 操作,麻烦😢
自动集成部署(推荐)
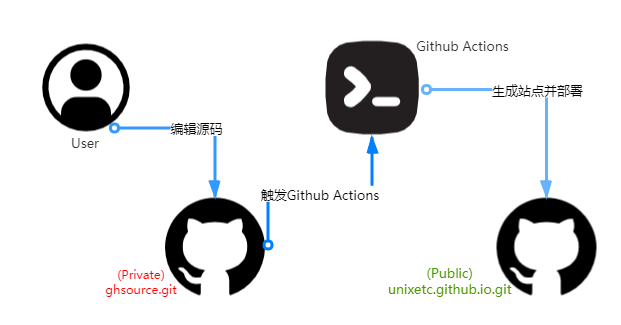
使用Github Pages来部署个人网站,通过Github Actions生成站点部署,如下图所示

建立Repositories
1、建立一个Repositories关联 blog项目(公共库或者私有库都行)放置hugo 搭建的blog源码
2、然后再建一个username/username.gihub.io.git属性为公有(public)库,用来放置打包public目录的文件并设置Github Pages服务.
设置Deploy keys与Secrets
1、首先,生成新的SSH(新的SSH可以换名称)
# 修改 username 为你自己的 GitHub 用户名
ssh-keygen -t rsa -b 4096 -C "username@users.noreply.github.com"
# 注意:这次不要直接回车,以免覆盖之前生成的,比如新生成了deploy_key_repo1私钥,deploy_key_repo1.pub公钥
2、在源码公有(public)库 Settings > Secrets > New secret。填入value为deploy_key_repo1私钥,Name为 DEPLOY_KEY(与 Workflow 配置对应)
3、前往 GitHub Pages 仓库,Settings > Deploy keys。填入value为deploy_key_repo1.pub公钥,并勾选 Allow write access。
建立Workflow配置
1、在blog项目目录创建.github/workflows/deploy.yml的文件,内容如下:
| |
需要调整的就是值如下:
steps下的uses配置的是reuixiy作者的hugo-deploy🚀
DEPLOY_REPO为你的Github Pages的仓库
DEPLOY_BRANCH 部署分支
DEPLOY_KEY 就是源码库配置的DEPLOY_KEY
测验流程
1、在本地blog源码库提交一个commit并且push
2、打开github源码库中查看Actions处的build日志,building报错日志需要细致关注,可以先本地起一下build筛选一些问题,在重复步骤1和2
3、源码库Actions执行完成后会触发GitHub Pages库的部署更新差不多总流程2分钟不到😃😃
4、点击你的https://luckyre.github.io/即可查看部署成功的结果